

Semakh: The Light Horse Charge Beyond Beersheba
Eleven months after Beersheba, the Australian Light Horse rode into another hail of machine-gun fire.
The famous photograph may be disputed, but the courage of the men who fought at Semakh is not.
The Charge of Beersheba has become one of the defining moments in Australia's military history. Its fame rests on the extraordinary courage of the men who rode into Ottoman fire, and on an iconic photograph whose authenticity remains contested.
But the story of the Australian Light Horse did not end at Beersheba, nor does its significance depend upon a single photograph.
On 25 September 1918, as General Allenby's forces swept north through Palestine, the 4th Light Horse Brigade was called upon to capture Semakh, a railway station on the southern shore of the Sea of Galilee.

The defenders were entrenched in stone buildings and supported by German machine-gunners. The Australians advanced before dawn, came under heavy fire, and were ordered to charge.
This time, they carried swords.
From Mounted Riflemen to Cavalry
There was an important development between Beersheba and Semakh, and it helps explain why the two charges were fought differently.
The Australian Light Horse had traditionally operated as mounted riflemen. They were highly mobile troops who used horses to cover ground quickly, but generally dismounted to engage the enemy with rifles and bayonets.
They were not quite conventional cavalry.
At Beersheba, the distinction was particularly evident. The troopers charged on horseback with their bayonets fixed to their rifles, which were slung across their backs. It was an extraordinary tactic, but it was not the traditional cavalry charge with drawn swords.
Military commanders had been debating the role of mounted troops and the usefulness of traditional cavalry weapons. The experience of the Palestine campaign, together with the success of mounted cavalry elsewhere, helped bring about a change.
In 1918, the Australian Mounted Division was issued with swords, and its troops began training in traditional cavalry tactics. The 4th Light Horse Brigade was among the formations prepared for this new role. Its regiments, including the 11th and 12th, would now have the ability to charge on horseback with drawn swords, while retaining their traditional skill at dismounted fighting.
It was an important development. The Light Horse had not abandoned their mounted-infantry role; they had acquired another way of fighting.
The change gave the Light Horsemen another weapon and another way of fighting. They could now attack from horseback with drawn swords, but retain the ability to dismount and fight on foot when circumstances required.
It was a significant development, and Semakh would provide an early opportunity to demonstrate just how effective this combination could be.
Eleven months after charging at Beersheba with bayonets, the Australian Light Horse were preparing to ride into battle with swords drawn.
The Road to Semakh
By September 1918, the campaign in Palestine had entered its decisive phase. General Edmund Allenby's forces had broken through the Ottoman front during the Battle of Megiddo. The Desert Mounted Corps, commanded by Lieutenant-General Harry Chauvel, surged through the gap, racing north to cut off the retreating Ottoman forces.
The 4th Light Horse Brigade, commanded by Brigadier General William Grant, was ordered to seize Semakh, a strategically important railway junction on the southern shore of the Sea of Galilee.
The station was a key point in the Ottoman-German rearguard covering the retreat towards Damascus. Its capture would help open the way for the Allied advance north.
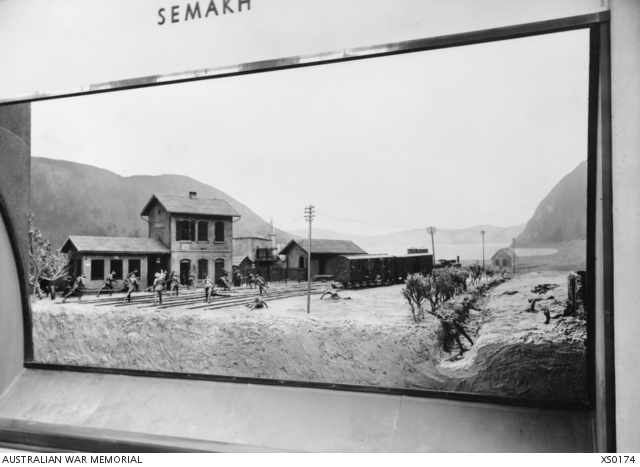
The Charge Before Dawn
In the early hours of 25 September, the Australians advanced towards Semakh in near darkness. Two squadrons of the 11th Light Horse Regiment were directed against the eastern end of the town, while two squadrons of the 12th attacked from the west.
At approximately 4.30 a.m., the leading troops came under heavy rifle and machine-gun fire. The defenders were concealed in and around the railway buildings, and the darkness made it difficult to identify their positions.
The order was given to form a line and charge.
Reaching the station, the troopers dismounted and fought their way through the railway yards and buildings with rifles and bayonets. The swords had done their work in the mounted assault; now the men were fighting on foot, just as the Light Horse had trained to do.
The fighting was fierce and often at close quarters. German machine-gunners and Ottoman soldiers resisted stubbornly, but the Australians pressed forward.
In approximately one hour, at 5:30 a.m., Semakh was in Australian hands.
The Cost of Victory
The victory came at a considerable cost.
Australian casualties included 14 men killed and 29 wounded. The horses also suffered heavily, with 61 killed and 27 wounded. These figures are recorded in an Australian Defence account of the battle.
The defenders suffered approximately 98 killed. The number of prisoners is recorded slightly differently in historical accounts: the Australian War Memorial gives 365, while another Defence account records 364, including 150 Germans.
The losses among the horses are a sobering reminder of the sacrifice made by these animals throughout the campaign. They carried their riders into danger without understanding the battle, and their endurance was essential to the success of the Light Horse.

The burial of horses following the fighting at Semakh, September 1918. Australian War Memorial.
Beyond Beersheba
The capture of Semakh helped open the way for the rapid Allied advance towards Damascus, which fell on 1 October 1918.
The Ottoman front in Palestine was collapsing. Within weeks, the campaign that had begun with the struggle for Gaza and the breakthrough at Beersheba had brought the Allied forces deep into Ottoman territory.
The Light Horsemen had demonstrated that they were not simply mounted troops capable of a spectacular charge. They were adaptable soldiers who could operate over long distances, attack rapidly, and dismount to fight effectively when circumstances demanded.
At Beersheba, they had relied on speed, surprise and the bayonet. At Semakh, they charged with swords and fought through a fortified railway station.
The circumstances were different, but the courage was unmistakable.

A Legacy Beyond a Photograph
The debate over the Beersheba photograph reminds us that history must be examined carefully, that evidence matters, and that even our most cherished stories deserve scrutiny.
But the story of the Australian Light Horse is larger than one photograph.
At Beersheba, at Semakh and throughout the Palestine campaign, these men demonstrated extraordinary courage, endurance and adaptability. Their achievements belong to the historical record, whether or not every image associated with them proves authentic.
And perhaps that is the most important lesson of all: history is not diminished by honest investigation. It is strengthened by it.
The famous photograph may remain a mystery. The courage of the Light Horse does not.
Footnote:
Following consultation, the image in the article is of a surviving Turkish/Krupp 75 mm field gun (Model 1903 type) held at the Army Museum, Bandiana. The site notes that it (and several others) have been claimed as “the Semakh gun,” but that claim is disputed.
Charlie Clelland, who has researched the surviving Ottoman/German guns in Australia, points out :
- Only one artillery piece was captured in the Semakh action.
- The 11th Light Horse war diary recorded its serial number as 2064.
- Australian War Memorial trophy records identify that gun as a 105 mm howitzer (not a 75 mm field gun).
- It was allocated to Toowoomba, Queensland, and is believed to have been scrapped in the 1930s.
So the “10 mm” I heard is almost certainly a reference to the 105 mm (sometimes written as 10.5 cm) howitzer. Clelland’s conclusion is that the various 75 mm Krupp guns still existing in Australia (including the Bandiana example and the well-known “Semakh Gun” at Enoggera that once stood at Sandgate) were not the piece captured at Semakh, despite repeated claims by Light Horse associations. Those claims appear to rest on tradition rather than the war diary and trophy allocation records.
This is a useful parallel to the Beersheba photograph debate in our previous article: popular association and local legend do not always match the primary records. The Semakh action did produce a captured gun, but the surviving 75 mm pieces often linked to it do not appear to be that gun. The actual trophy (the 105 mm howitzer, serial 2064) seems to have been lost. No doubt to build a windmill ..... or so I am told. Monty.
BLOG COMMENTS POWERED BY DISQUS


